Windows 10, Windows 11 Enable Remote Desktop RDP To multiple User
Want to allow multiple RDP sessions in Windows? You can establish multiple remote desktop connections at the same time on a Windows system still, this feature is blocked by license. It prevents you from creating a Terminal RDP server. However, you have to buy a Windows Server license, RDS CALS, If you need this service.
If you want a free alternative you can use RDP( Remote Desktop Protocol) to produce multiple Connections. In this composition, we will guide you to how you can enable RDP for multiple users on your Windows 11 computer.
 |
| Windows 10, Windows 11 Enable Remote Desktop RDP To multiple User |
Use the following steeps for enabling the Remote Desktop Connection on Windows 11, Windows 11
- Use RDP wrapper library
- Modify termsrv.dll Using Hex Editor
- Patch termsrv.dll with PowerSheel Script
- modify the Local Group Policies
Now Lets start-
How to allow multiple RDP sessions in Windows
1- Use RDP wrapper library
RDP wrapper library is open source free to use from GitHub project that works between intermediate remote desktop service and Service Control Manager (SCM).
It allow users to make multiple RDP session on windows 10 and windows 11 and also you configure it on windows home addition without testing the "termsrv.dll" file. For simultaneous connection RDP wrapper library load the termsrv.dll library with updated parameters. But it should better for you to check the unpatched "termsrv.dll" file before installing RDP Wrapper Library
Follow the steps to enable RDP Wrapper Library
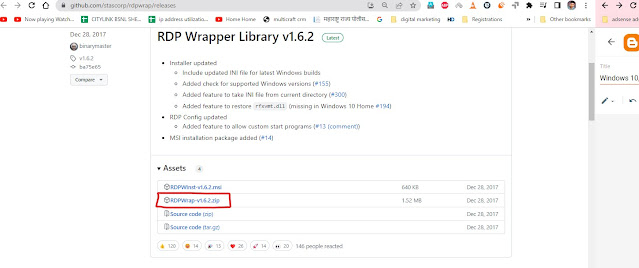
Download RDP Wrapper Library From github.com
Use Firefox
Browser Block the downing the file allow this file to download.
After Download the file Extract the contents of zip file.
Then Click Right click on "Install.bat " and select run as Administrator
Then Click on "RDPConfig.exe" to open RDP Wrapper Configuration and complect the installation process.
After installation RDP Wrapper show running but not working on windows 10 (ver 10.0.19041.1320)
Download the rdpwrap.ini file currnet version on your computer from raw.githubusercontent.com.
Open the download file, Select all the content from it, Copy it using Ctrl +C
Then Open file Explorer and go to C:\Program Files\RDP Wrapper\rdpwrap.ini file
open the ini file rdpwrap.ini and directly past the code and save it.
Then Open file Explorer and go to C:\Program Files\RDP Wrapper\rdpwrap.ini file
open the ini file rdpwrap.ini and directly past the code and save it.
Follow the steps:
1: Right click on file and go to Properties2: Click On Security Tab
3: Click on Change Permission , click edit
4: Click on Add
5: Click on Advanced
6: Click on Find Now
7: Select the Current user Which one you used while the installation make sure it have administrative right
8: Select the User and Click on Ok
9: After Give selection the user Give the Full Control and click on apply and ok
10 : Then past the code and save it
After That Reboot The Computer
Then Hit on RDPConfigure.exe to open RDP Wrapper Configuration, Verify all The items are green in Diagnostics section
Hit on RDPcheck.exe to open a secondary RDP session or connect multiple RDP session from your remote Computers
Thanks.


